Darui Electric recommends:
Instructions for the Lightning Counter Tester
1. Please charge the device before use. To ensure effective charging and extend battery life, use the dedicated charger. It takes about 3-4 hours to fully charge an empty battery. The red light on the charger indicates charging; the green light indicates charging is complete.
2. According to the installation height of the counter, appropriately extend the telescopic discharge rod.
3. For the dedicated grounding wire, insert one end's plug into the jack at the rear of the tester, and connect the other end's clip to the earth.
4. Press the red button to apply high voltage for about 1 second. The indicator light will illuminate (with a slight flicker).
Then gently tap the connection point between the counter and the lightning arrester to perform the test.
5. After each tap, the tip of the discharge rod should be moved away from the counter. If you need to repeat the test, do not release the button. Wait 1-2 seconds until the indicator light flashes again, then tap again to test.
6. Continuous testing may cause the tester to heat up. Please allow appropriate intervals to reduce malfunctions and extend battery life.
7. The tester output has three levels: high, medium, and low, which can be adjusted via the toggle switch on the top to suit different types or brands of counters.
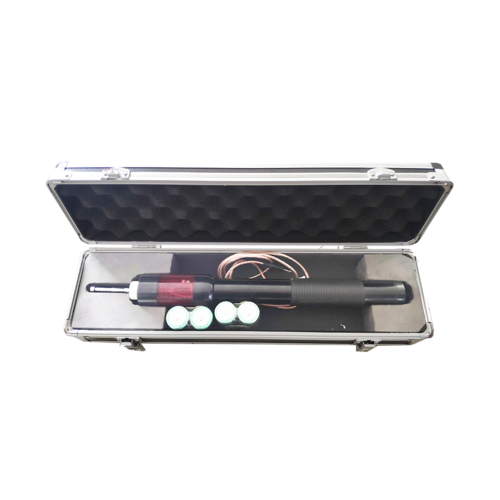
Lightning Counter Tester
1. Portable design, small size and light weight
2. Telescopic electrode can be adjusted in length
3. Dual power supply (AC/DC) with built-in rechargeable battery; one charge can last for half a year
4. Strong anti-interference capability
5. Voltage 1500V
Lightning Counter Tester
1. Please charge the device before use. To ensure effective charging and extend battery life, use the dedicated charger. It takes about 3-4 hours to fully charge an empty battery. The red light on the charger indicates charging.
2. According to the installation height of the counter, appropriately extend the telescopic discharge rod.
3. For the dedicated grounding wire, insert one end's plug into the jack at the rear of the tester, and connect the other end's clip to the earth.
4. Press the red button to apply high voltage for about 1 second. The indicator light will illuminate (with a slight flicker). Then gently tap the connection point between the counter and the lightning arrester to perform the test.
5. After each tap, the tip of the discharge rod should be moved away from the counter. If you need to repeat the test, do not release the button. Wait 1-2 seconds until the indicator light flashes again, then tap again to test.
6. Continuous testing may cause the tester to heat up. Please allow appropriate intervals to reduce malfunctions and extend battery life.
Note: The above information and technical parameters are compiled and released by Yangzhou Darui Electric Co., Ltd.