Darui Electric recommends:
Product Features:
1. Portable design, small size and light weight
2. Telescopic electrode can be adjusted in length
3. AC/DC dual power supply, built-in rechargeable battery, one charge can last for half a year
4. Strong anti-interference capability
5. Maximum voltage 1500V
Technical Parameters:
1. Voltage: DC 900V, 1200V, 1600V three gears
2. Discharge current >100A/10US
3. Weight: 420g
4. Length: 450cm
5. Test interval time: 1 second
6. Test times: 300 times
7. Charging: 3~4 hours
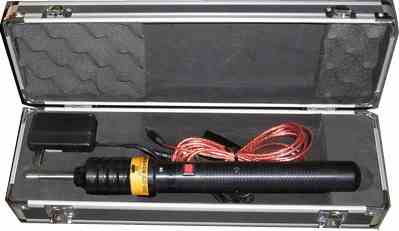
The power switch is located between the body and the head. Rotate it 90 degrees in any direction. A "click" sound indicates the power is on, otherwise it is off.Before use, insert the grounding wire into the tail and connect it to the ground. According to the height of the counter, pull out the telescopic conductive rod of the head to an appropriate length before turning on the power. After turning on the power, the green light will be on. Wait for the red light to turn on (about 3-5 seconds), then you can test the lightning counter through the head telescopic conductive rod. The instrument can be tested repeatedly without turning off the power (the conductive rod should be away from the test object during each charging). Remember: after the test, turn off the power first, then discharge the head conductive rod to the tail grounding wire before storing the instrument. This instrument uses four No. 1 batteries, which can support more than 2000 discharge tests. If the battery is low, the charging time will be extended, and the batteries should be replaced in time. Suggestion: if not used for a long time, remove the dry batteries from the instrument!
1. Please charge before use. To ensure the charging effect and extend battery life, use the dedicated charger. It takes about 3-4 hours to fully charge an empty battery. The red light on the charger indicates charging.
2. According to the installation height of the counter, properly pull out the telescopic discharge rod.
3. For the dedicated grounding wire, insert one end plug into the tail jack of the calibrator, and connect the other end clip to the earth.
4. Press the red button, turn on the high voltage for about 1 second, the indicator light will light up (slightly flashing),
then gently click the connection end of the counter and the lightning arrester for testing.
5. After each click, the discharge rod end should be away from the counter. If repeated testing is needed, do not release the button. Wait for 1-2 seconds until the indicator light flashes again, then click again for testing.
6. Continuous testing will cause the calibrator to heat up. Please pay attention to appropriate intervals to reduce failures and extend battery life.
7. The output of the calibrator has three gears: high, medium, and low, which can be adjusted through the toggle switch on the head to adapt to testing different types or brands of counters.
8. If the indicator light does not flash after pressing the button for more than 3 seconds, it indicates that the battery needs charging.
After each click, the discharge rod end should be away from the counter. If repeated testing is needed, you do not need to release the button. After about 1-2 seconds when the indicator light flashes again, you can click again for testing.
 Note: The above information and technical parameters are compiled and released by Yangzhou Darui Electric Co., Ltd.